Curried eggplants:

This delicious dish is inspired by the “Stuffed Curried Aubergines” recipe in Jamie’s new book “VEG”: its got fantastic new ideas. If you’re trying to add more veggies to your diet, it is definitely worth your while.

Like everything else that I do in the kitchen, I never ever follow a recipe, unless I’m making a cake. I just get inspired by them, and make my own as I go along. Depending mainly on personal likes, dislikes, and ofcourse on what I’ve got available in my kitchen at the time. 

Ingredients:

6 little “finger” eggplants (if slightly larger size, still no problem, you can serve one instead of two)… about 500grs

1 medium onion

1 garlic

4cm piece of ginger

1 espresso size spoon of each of the following:

cumin

coriander

turmeric

paprika

garammasala

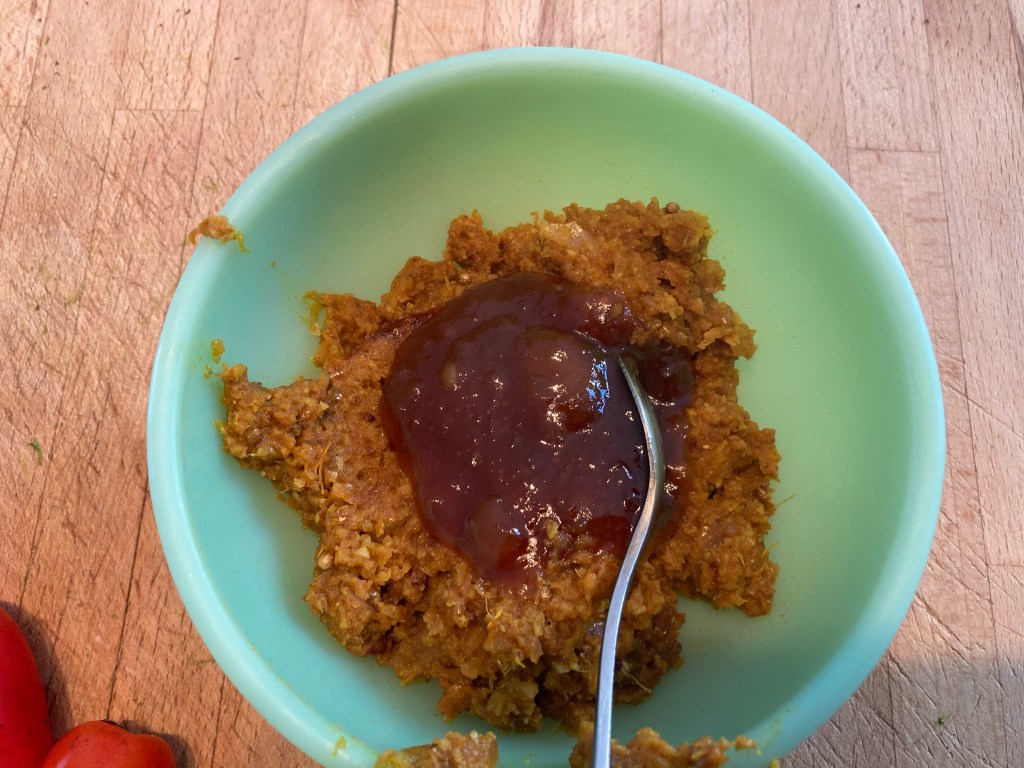
2 tsps mangoe chutney

1 can coconut milk

a bunch of tomatillos cut in half

Method:

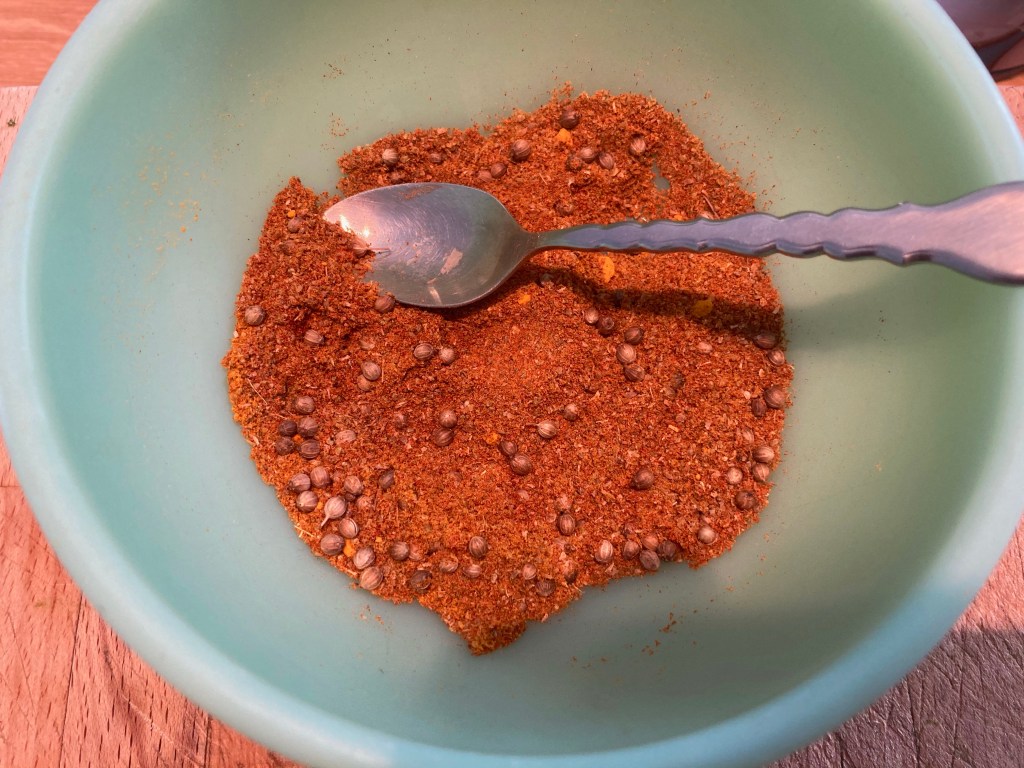
Mix all spices together and place in frying pan wih a bit of olive oil until it releases the aromas

place in a little bowl and set aside

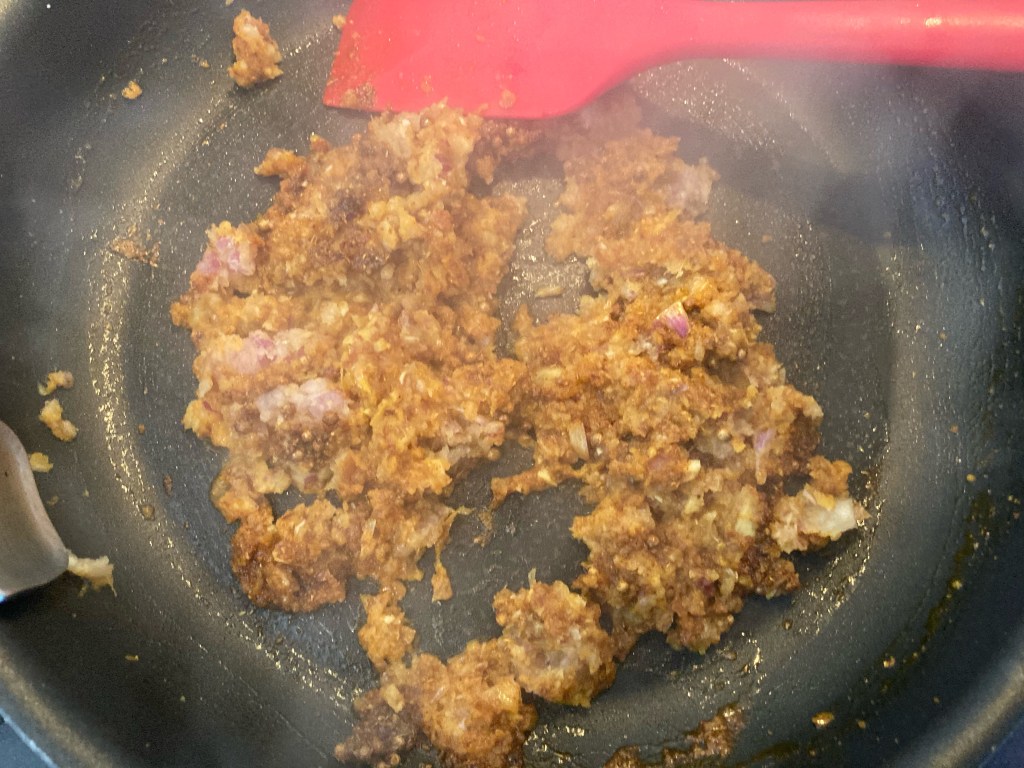
Roughly cut onion, garlic, ginger and place in small food processor till fine

lightly fry in a bit of olive oil

transfer to the same bowl with the spices

add the mangoe chutney and mix to combine all ingredients into a firmish paste

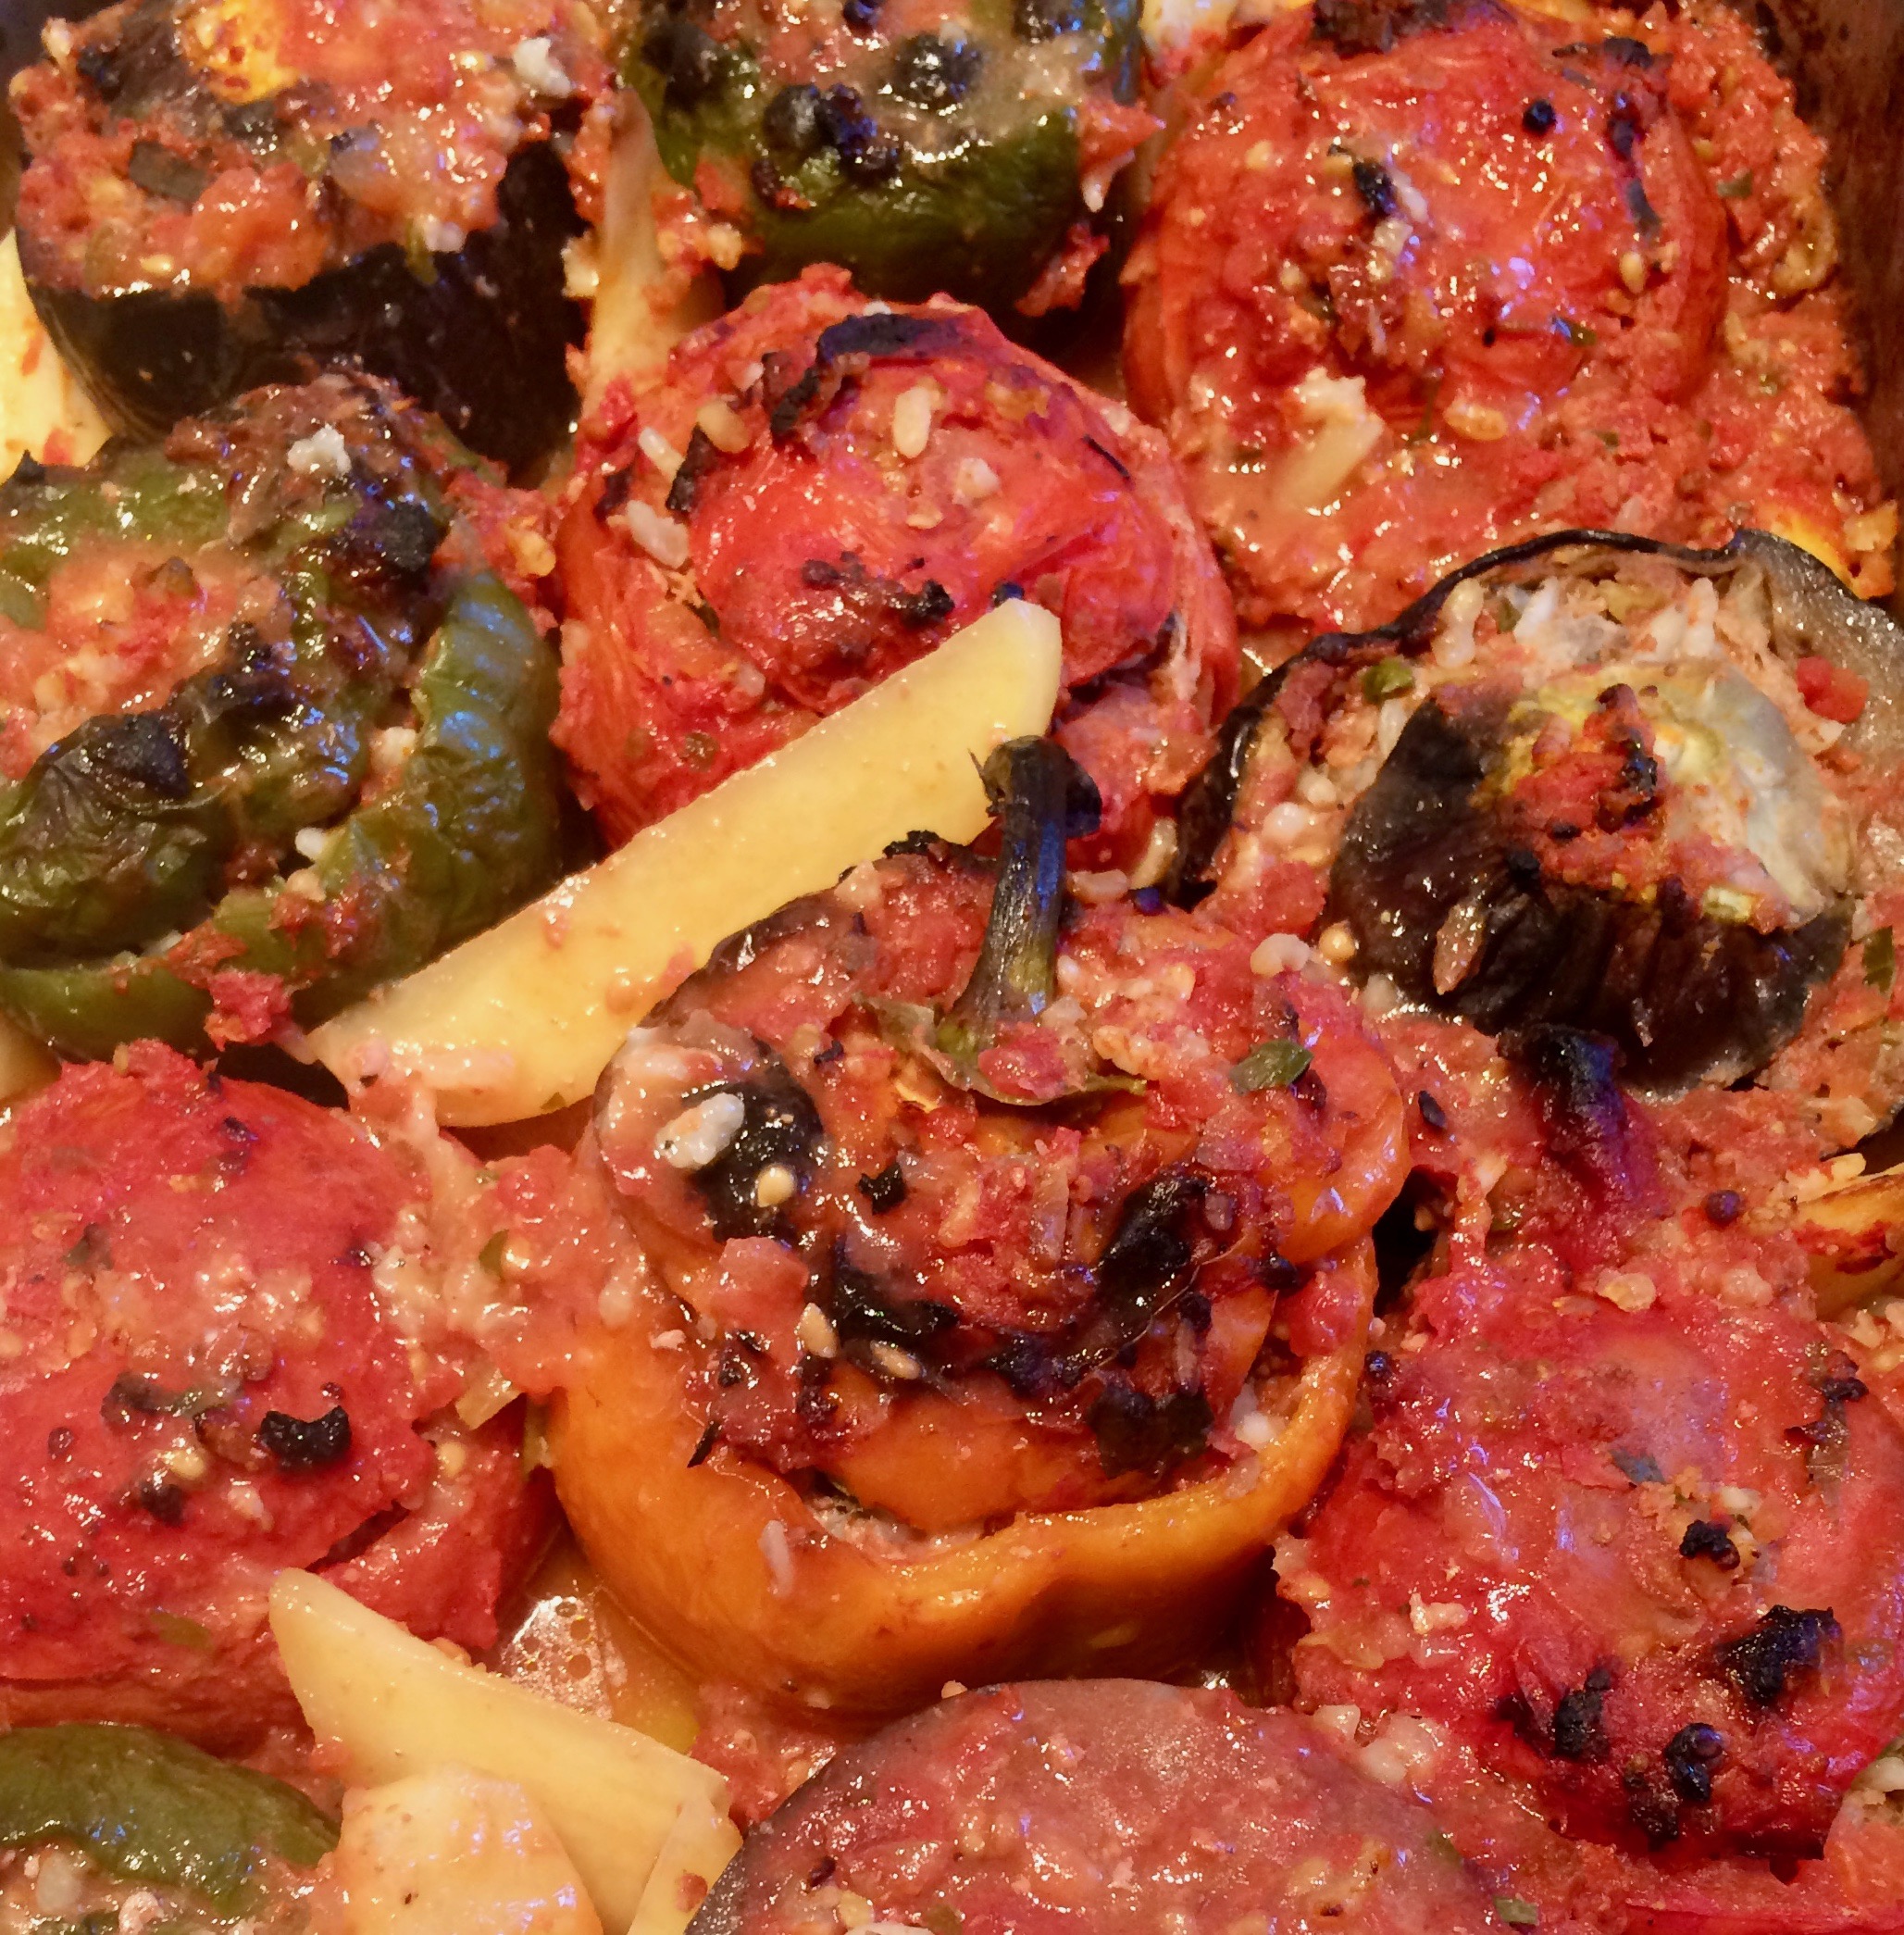
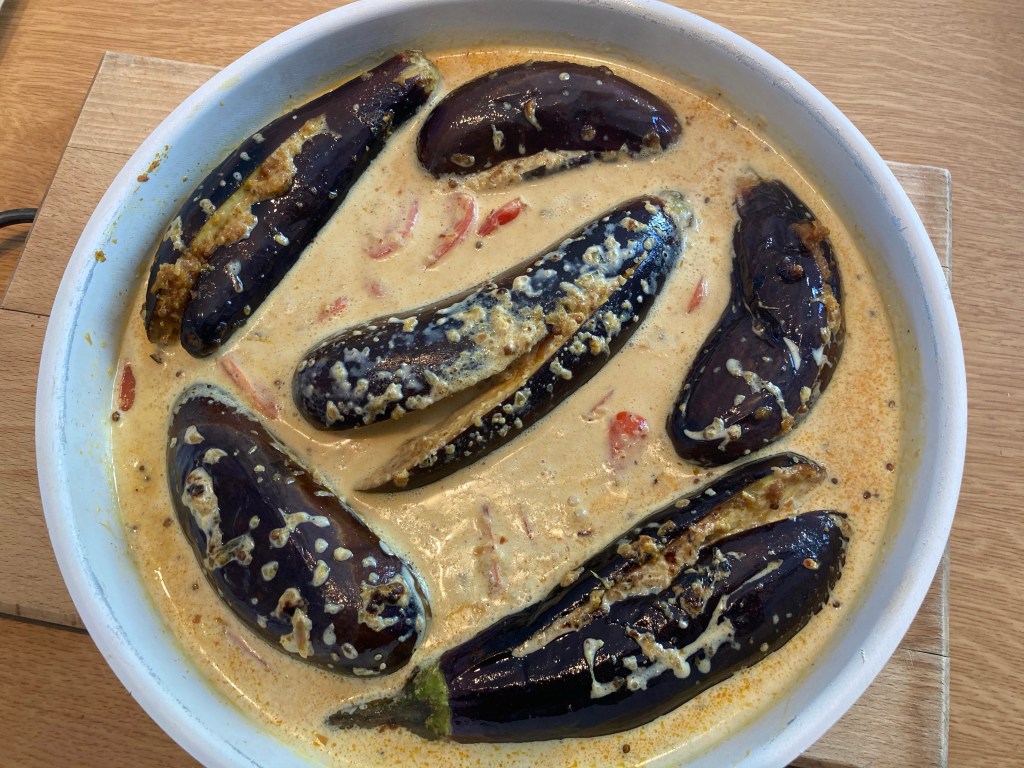
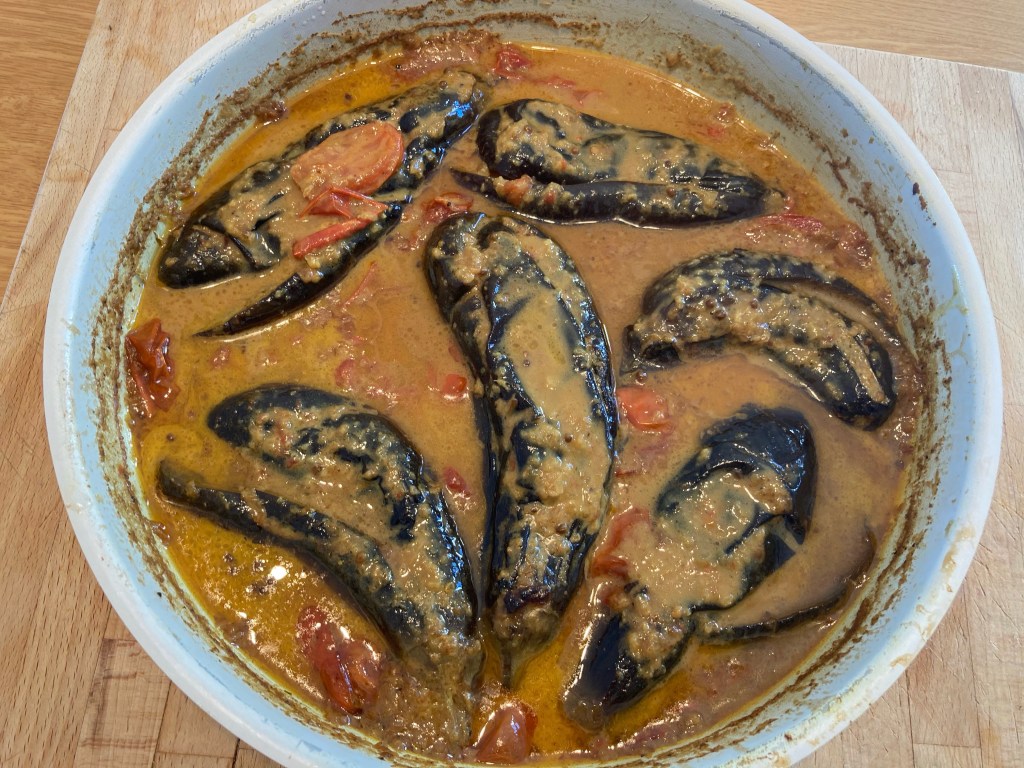
peel the top of each eggplant just with your fingers to remove the leaf like part, leaving the green part and the stem intact to hold the eggplant togetther

cut it length wise in half till before reach the green part (if you’re using larger eggplant, you can make two cuts instead of one, while making sure it still stays attached)

open each eggplant and stuff it with the onion/spice mixture generously (make sure you use the entire mixture)

fry lightly in a bit of olive oil (a couple of minutes on each side)

add the coconut milk and the tomatillos

bring to a boil

cover tightly with silver foil and place in a 200C oven for about 40mns until the sauce thickens and the eggplant is tender

if you have fresh corriander chop some on top before serving (I almost never succeed in finding it in my grocery store!)

serve with basmati rice and some yoghurt on the side

It is absolutely de-li-cious!!! 

Advertisement

Youvarlakia:

Today’s post is for my friend and class-mate Dalou, in Canada. She recently shared a childhood memory from our growing up years in Alexandria, of a “Greek soup with meatballs and lemon”. Here it is: Youvarlakia.

Hoping that it matches every bit of your memory.

My first introduction to this dish was on a cold winter day, over thirty years ago, where I was graciously invited by my friend Kathy to her in-laws for a Sunday lunch. Many a Sunday that winter, saw me back at Kiria Vassiliki’s table, having my first tastes of wonderful home made Greek specialties, a treat that has contributed to my love and appreciation of the Greek culture.

It is important that I mention here that Youverlakia is always made with ground beef. In the recipe below I have substituted the beef with ground turkey. This is ofcourse a personal choice, but I can assure you that it’s every bit as tasty with turkey as it is with beef, and a whole lot lighter. 

Also not every Youvarlakia has potatoes and carrots in it. But this is how I first had it, and its how I’ve been making it ever since.

INGREDIENTS:

SOUP:

8 cups water

3 potatoes peeled and cut into chunks

3 carrots peeled and cut into chunks

2 bay leaves

1 soupe cube (in this case chicken)

salt & pepper

MEATBALLS:

450 grs ground beef (in this case ground turkey)

3/4 cup round rice (uncooked)

1 small onion finely chopped

2 tbsps parsley

2 tbsps dill

1 large egg

2 tbsps olive oil

salt & pepper

AVGOLEMONO:

2 eggs

juice of 2 whole lemons

1 tbsp corn starch 

METHOD:

Mix ingredients for the meatballs, cover, and refrigirate for a ½ hour. Then shape into small balls.

Combine the ingredients for the soup, and bring to a gentle boil.

Drop the meatballs one by one in the simmering soup, cover and cook for 30mns.

Whisk the eggs, add the lemon juice, mix in the corn starch.

Now go close to the soup, take a ladle full of the hot soup at a time, and mix with the egg/lemon mixture. Add another ladle full of soup and keep mixing, bringing the temperature of the egg mixture gradually up to prevent curdling. Add it gradually to the soupe and tilt the pot around to mix well without braking the meatballs.

Simmer for a few minutes to thicken the soup.

Serve with fresh crusty village bread. 

Grilled Halloumi w/peach

After decades in the kitchen, it can get quite boring reproducing the same old dishes over and over again. So I am always on the lookout for anything new and exciting in the world of food. Especially if it’s in the “appetizer” or “finger food” form. 

My favourite way to eat: drinks and nibbles.

I first ran into a version of this dish as I was coasting through facebook, a quick video by Jamie Oliver popped up in my feed. Interesting I thought, I never knew you could grill fruits! Sometime later as I was searching for new appetisers ideas for a little get together in our verandah, this dish came to mind. I searched high and low for it, until I finally found it on youtube.

Jamie’s version was on skewers on the grill. Since I have a strong aversion to outside grilling, I decided to forego the skewers, and grill on a baking sheet in the oven.

I have now made this dish at least half a dozen times, and in all honesty I can not find enough words of praise, it is undoubtedly one of my new absolute favourites!!! 

Thank you Jamie!

Ingredients:

1 large peach or 2 smaller ones (not too soft)

1 clove garlic (grated)

¼ peach (grated)

salt/pepper

oregano

olive oil

a pieace of fresh crusty bread (for later)

Method:

Cut the Halloumi into cubes

Cut the peach into smilar size cubes

add the grated garlic & peach, salt, pepper, oregano & olive oil,

mix really well with your hands to cover all the pieces.

Cover the dish and refrifirate till later.

Cut the bread into thick-ish slices, then into cubes, again similar size as the halloumi and the peach. Put in a small zip lock ready for later.

You will have to wait until your guests arrive before you assemble this dish.

Set oven to grill, and adjust heat to maximum. 

Spread your halloumi and peach pieces on a baking sheet.

Put your cut up bread into the same marinade and mix well to coat all the pieces.

Add the bread on the same baking sheet, in between the halloumi and the peach. Make sure it is not all crammed on top of each other as it will not grill properly.

Put the tray on the highest shelf in the oven.

Dont go far as it will not take long. Halloumi should have a nice colour to it, and the bread should crisp nicely.

Depending on your oven, you may need to turn a few pieces over half way in between.

When ready, transfer on a large platter, and tear some fresh mint leaves on top.

P.S. If I could eat this everyday, I would!!

Christa’s Spinach Pie:

Our friend Christa loves to experiment with new dishes. So whenever we get together, in her house or ours, it’s almost always something new that one of us has put together and is eager to share with the other.

It is of great help ofcourse that both our husbands love food, and both have a “forgiving palate”, a good feature to lighten up our sometimes failed experimentations.

This one right here is a great success, impressive looking, and really easy to make. I have no doubt that you will love it as much as we do.

What makes this pie different from the traditional Greek Spanakopita, is 1) the pastry: puff pastry instead of filo, and 2) the cheese: Anthotiro instead of just feta. Also 3) the spinach is used fresh instead of cooked and drained.

I loved the use of Anthotiro because the cubes stay almost intact after cooking, and easy to see in the final product, instead of being crumbled into the mixture. When the pie is sliced, hot or cold, it is very pretty looking. 

So back to the star ingredient “Anthotiro”. 

This cheese is made from sheep or goat milk, or a mixture of both. It can be fresh like Misitra, or dry also like Misitra.

The version used in this recipe is dry Anthotiro.

Ingredients:

1 sheet defrosted puff pastry (400 grs)

4 pieces sundried tomatoes preserved in liquid, chopped small

2 small scallions chopped small

180 grs anthotiro cut in cubes

80 grs crumbled feta

80 grs grated parmesean

125 grs fresh spinach chopped

1 beaten egg for brushing

black sesame to sprinkle on top

Method:

Spread the pastry sheet

sprinkle the ingredients evenly one at a time

start with the sundried tomatoes, the scallions, the anthotiro, the feta, the spinach, ending with the grated parmesean

roll the pastry carefully, tucking in as you go along

pinch and seal the seam with your fingers

close the two ends the same way, by pressing together with your fingers

turn carefully on a baking sheet making sure the seam is down

brush with the egg

sprinkle the black sesame

make slits with a sarrated knife marking where you would slice later

bake in a preheated 180C oven for 40 mns

let cool before slicing

Henrike’s Mushroom-balls:

IMG_2966 2

I was introduced to these wonderful “vegeterian meatballs” this summer, by our young friend Henrike, visiting with his family from Costa Rica. Following up on a “dare”, he graciously offered to relieve the tired hostess, and cook a full meal for all 7 of us in our kitchen. I say full: meaning complete with desert! (my husband’s favourite: creme brulee!!). Don’t hold your breath because I will not be making “that” any time soon! So lets just stick to the mushroom balls for now.

I have experimented with this recipe many times since the summer, and as always have ended up changing a few details in the process. The size of the balls for one, and I chose to bake instead of fry.

2 cups raw chopped mushrooms

1 cup cooked brown rice

1 onion roughly chopped

1 garlic clove

a handful of parsley

Place in food processor till well combined

add:

1 cup parmasean

1/2 cup bread crumbs

2 eggs

salt

pepper

Further process till all ingredients are well combined (mixture should be sticky & wet but able to form balls that hold together.)

Shape into balls and place on wax paper on a baking sheet. Sometimes the mixture is just too sticky to handle like you would meatballs, in which case use a teaspoon, smooth the rounded top lightly with your finger, and slide onto the baking sheet.

Bake in 200 centigrade pre-heated oven for 20mns or until brownish and firm to the touch.

These mushroom balls freeze beautifully, and will be there for you whenever you need them. Last minute guests? Pop them in the oven directly from the freezer, and serve warm with a dip of your choice. Or on lazy days, they can be dropped directly into hot simmering tomato sauce and served over spaghetti. A bit of grated parmasean on top, a large bowl of salad, and you’re set.

Enjoy!

Fish Pie


IMG_2972 2

My absolute favourite way of cooking is making something up, based on what’s available in my fridge and freezer. Most of the time it works, and I surprise myself with a new dish, which I try to recreate a few times after, in order to perfect it, and ofcourse in order not to forget it!

My new inventions are not always a success ofcourse, but they get eaten anyway, and are certainly a great addition to my “what not to do” list.

This fish pie dish was born this summer. This is my 3rd go at it, and I think I’m happy with it. If you make it, do let me know what you think: additions? Subtractions?

Ingredients:

1 large onion chopped

2 apples peeled and chopped

2 large tsps curry powder

1 cup frozen peas

1 cup sliced sauteed mushrooms

1 cup rice

1 soup cube

1 cup chopped parsley

IMG_2941IMG_2942

400 grs fish filet cut into cubes (I use defrosted perch filet)

1 1/2 cup medium shrimp defrosted & deveined

a piece of ginger grated

1 lemon grated

1 tsp paprika

1tsp turmeric

salt (I used himalyian)

olive oil

split the spices in two and use to marinate the fish and the shrimp separately. Set aside until the rice is cooked

1 sheet puff pastry (defrosted)

Method:

1) The rice:

sautee the onion in a bit of olive oil till soft-ish

add the chopped apples, stir

add the curry and keep stirring

add the sauteed mushrooms

add the rice

add the water (according to the instructions on your rice. I’d add slightly more to allow for the apples & mushrooms)

add the soup cube

cover and simmer till rice almost done

stir in the peas

remove from heat and keep covered for 10 mns

transfer into your pie dish and set aside

2) The fish/shrimp:

IMG_2945IMG_2944

cook your marinated fish in a non stick frying pan, taking care not to stir much so it doesnt break

dont over crowd the pan, just a little at a time

you could deglaze with a little white wine if necessary

then cook your shrimp. Very briefly just to get a colour

IMG_2947


3) Assembling:


add the cooked fish/shrimp to your rice

add the chopped parsley

mix loosely with a fork to combine all ingredients

place your defrosted and refrigerated pastry on top

IMG_2968IMG_2969

brush with a beaten egg

decorate

brush the decoration

bake in a preheated 200 centigrade oven for 20-25 minutes or until the pastry is cooked and nicely coloured.

IMG_2970IMG_2972 2

You need to serve immediately.

Enjoy!

Rice Pudding (Rozz bel-laban)

IMG_2918

This recipe is courtesy of my good friend Lina.

It is plain-old rice pudding ofcourse, common to almost every culture that we know, but this one has got the unmistaken middle eastern touch to it: “mastic” flavour! It is unbelievably delicious, and tastes almost like ice cream, you’ve got to try it.

Some of you will ofcourse ask what on earth is “mastic”??? It is shown in the close-up picture here.

IMG_2919

Translation? The dictionary says: an aromatic resin or gum extracted from a tree grown in the Mediterranean or Middle Eastern region.

I have no clue where you would find it in “your” country, a middle Eastern grocer I would guess. I have no problem finding it in Greece, as it is also common to Greek deserts (especially ice cream!). They also have a “Mastikha” liqueur from the island of Chios; yummy served on ice.

Back to our rice pudding that my husband has been asking me to make, for many days now!!

Ingredients:

IMG_2909

3/4 cup rice

8 cups milk

1 cup sugar

1/2 tsp mastic grounded w/1 tbsp sugar (place both in coffee grinder and blitz till powder form)

1/2 cup chopped pistachios to garnish

Method:

soak rice in 2 cups hot water for 1 hour, then boil for 10mns

add milk and stir almostconstantly for 3/4 hour

(you really need to pay attention to this one, don’t go sit down with a book, or get involved with another dish, milk boiling over, or worse still blackened milk stuck at the bottom of a pan, is not pretty I assure you!)

add sugar, stir, keep for 5 more minutes

add mastic mixture and stir to combine

take off fire and let cool a bit

divide in small glass bowls

IMG_2915

cover with cling film (very close to the surface to prevent milk for forming a skin)

IMG_2916

refrigerate when cooled

sprinkle chopped pistachios on top before serving

IMG_2918

Enjoy!

Cheese pie (w/sundried tomatoes & olives):

IMG_2880

Sometimes I get bored with the same-old same-old, and depending on my mood and what I can find in my fridge, I try to come up with something different.

Today I’m cooking for my nephew Zeyad and his girl friend visiting for a couple of weeks.

I’m making oriental chicken cubes (already posted), rice w/vermicelli & pine nuts (already posted), a greek salad, and a cheese pie. At least some form of a cheese pie.

Sundried tomatoes have been on my mind for a while; yesterday I finally remembered to get some. I also got some really big and plump Kalamata olives. So… that’s what I’ll put in my pie today.

Ingredients:

IMG_2871

250 grs crumbled feta

100 grs grated emmental (to cut the sharpness of the feta a bit)

85 grs sundried tomatoes chopped small

85 grs black olives sliced

1 pkt filo pastry (450grs)

1 stick butter melted

Method:

divide your filo into 2 equal parts: ½ for the bottom and ½ for the top

brush your pan with butter (as well as the sides)

then start layering your filo on it one at a time, brushing with butter in between each sheet

Note: Your sheets are never going be the exact same size as your pan which is fine. Because you want them to overlap on the sides so that later you can fold them over, in order to keep the filling in and prevent it from oozing out the sides of the pan. As I lay each sheet of pastry into the pan, I try to have it fit nicely into 2 sides of the pan and the remaining I drape over the other 2 sides, making sure I covered all 4 sides as I go along. I don’t know how to explain it in words better than that, so you’ll just have to look at the pictures to understand what I mean.

when you’ve used your first half, spread the crumbled feta, the emmmental, the sun-dried tomatoes, and the olives over the whole surface

now start covering with the 2ndhalf of the filo, one at a time, brushing with butter between each layer and ending with brushed butter on top as well

cut your filo into squares before baking. Use a sharp knife and go with an up & down motion (cutting all the way to the bottom). Make sure you hold lightly with the fingers of your other hand to ensure that the sheets remain in place while cutting

bake in a 180centigrade pre heated oven till the pastry puffs up and is golden brown on top (about 30mns)

Enjoy!


Stuffed Tomatoes, Peppers & Eggplant

IMG_2869

So … Maggie & her friends went to Santorini for a few days. Before they left I asked her if she would like me to cook for them on their return. “What about Stuffed Tomatoes?” she asked the next morning. “Yes ofcourse!” said the woman living inside my body, who thinks she’s still in her thirties with tons of energy to spare!

So there we all are with two big trays of stuffed veggies and one fairly long preparation process!! And why 2 big trays when one would have been more than enough? Don’t ask, I honestly don’t know! My guess is that having grown up in a fairly large family, my eyes are so used to seeing big quantities that I still can’t judge the correct size of “enough”!

I prepared the veggies one day before, covered the trays well and refrigerated them, ready for stuffing the next day.

So once again, I add the same comment I’ve been making in a lot of my recipes it seems: keep in mind that the quantities below are for 2 large trays (which you see in the pictures) so half or reduce as needed!!!


Ingredients:

IMG_2816

9 tomatoes

6 peppers

3 eggplants

6 medium potatoes

2 medium onions or 1 large

3 or 4 garlic cloves

a bunch of parsley

500 grs ground beef

round rice (roughly 1 level tablespoon for each vegetable)

4 tsps tomato paste

2 soup cubes dissolved in 2 cups hot water

olive oil

salt & pepper


Method:

first the tomatoes:

wash & dry well, cut the tops off but keep them

scoop out the inside of each tomato (as per picture) & cover it with its own lid

Note 1*

the inside that you scooped out goes into the food processor,

add to it the 4 tsps tomato paste, salt, pepper, a bit of olive oil, and give it a few whirls

put in a bowl and set aside for later.

Next the eggplant:

if they’re large, cut it in two first, cut a topper for each, level a bit of the bottom (so it can stand in the tray without toppling over), and start scooping out the inside (as per picture)

make sure you have a top for each

Note 2*

the inside that you scooped out goes into the food processor

chop roughly and put it in a frying pan

next put the onions & garlic and process as well

add to the eggplant in the frying pan

salt, pepper, some oil, and saute lightly just to blend well and release the flavours

put the mixture in a large bowl and set aside for later

Next the peppers:

cut off tops, clean out the inside veins, & cover each with its own lid

Now the main work has been done!! you can stop here, cover the lot very well, and keep refrigerated till next day.

Next the potatoes:

peel and cut, put in a tray, salt, pepper, olive oil and mix together.

Set aside.

For the stuffing:

In your large bowl that contains the eggplant/onion/garlic mixture, add the following:

chopped parsley

ground beef

rice

a few tbsps of the tomato mixture in Note 1* above

1 cup prepared broth

salt, pepper, & a bit of olive oil

mix very well with your hands

you might need to add some water if necessary (the mixture should be on the loose side, not firm and packed together like a hamburger).

Now you’re ready to assemble.

Stuff each veggie, leaving a little bit of room at the top (see pictures), cover each with its lid and place in a tray

wedge the potatoes in between the veggies to fill the spaces and to keep the veggies straight up

pour the rest of the sauce in Note 1* above all over the veggies & the potatoes

IMG_2866

Place uncovered in a 200centigrade oven and bake till done. It should take around 1.5 to 2 hours.

Every half hour I get the tray out, and baste each veggie with the liquid that has now formed all around it. A turkey baster does the job perfectly.

I check the sides of some of the veggies with the edge of a sharp knife every now & then to make sure its done. I also taste a smidgen of the stuffing to ensure that the rice is ready.

When the tops are nicely coloured, take the tray out, and cover it well with silver foil to keep warm until you’re ready to serve.


Enjoy!


Kathleen’s Pastichio (Pasta w/ground beef & béchamel)

IMG_2812

Sol’s wife, Kathleen, was my best friend. Ever since we first met in their house in Canada, we took an instant liking to each other. A liking that grew stronger through the years. Fourty of them to be precise.

She decided to up and go as well, less than two years after Sol!

Will there ever be an end to missing all the wonderful people that you got to know and love? The people that affected and shaped your life into an infinitely better version than it would have been without them? Does the missing ever stop? Certainly not. You just learn to live without them, and to carry their memory not only inside your heart, but in your everyday life as well. By remembering them, by talking about them, by cherishing the time that you’ve had together, and by sharing your wonderful memories with others. They may be absent physically, but their spirit & their essence is now part of you. Who you are today is a product of all of them combined.

Now back to the pastichio! And I can’t think pastichio without thinking Kathleen. She certainly wasn’t a big lover of cooking, and tended to steer clear of the kitchen as much as possible, but… she had a few signature dishes that only she could make. Pastichio was one of them.

Pastichio has ofcourse become a universal dish, shared by many nationalities and many countries across the globe. It is a biggy in Greece ofcourse, but doesn’t stop there. Each of us “knows” of a different version, carrying a different name, and made slightly different.

Maggie, my niece and her family & friends, are here visiting. And there is no first day of Maggie in our house without Patischio, greek salad, and tzatziki! I usually make two big trays: one for that day, and another that I stash away in the freezer for her “last” day. This is for you Mag, we are so happy you guys are here!!

This is going to be a sort of a wing-it kind of situation, as I can not give you precise quantities of anything. It really all depends on the size of your baking dish. But not to panic, I assure you that it is simple and easy, just read on and look at the pictures. Believe me you can not go wrong.

P.S. Please keep in mind that quantities below are for 2 large baking dishes!!! so half or reduce as needed!

Ingredients:

penne…

IMG_2668 copy

I never ever measure the pasta! I first decide what dish I’m going to use, then I put in it the uncooked pasta, just to cover one loose layer. No more than one layer (see picture).

ground beef …

IMG_2794

again I just wing it, knowing that I like a lot of meat and sauce in this dish. For instance for these two big dishes, I have used 1kg ground beef.

Bechamel sauce:

2 litres full fat milk

olive oil

6 tablespoons flour (heaped)

200 grs grated cheddar

200 grs grated emmental

1 soup cube

Method:

boil your pasta al dente, rinse, drain and put in your baking dish

prepare the meat sauce and mix with your pasta. Be generous!

Now your bechamel:

heat the olive oil

add the flour & stir. Don’t be afraid to add more oil if needed. The flour mixture should be loose and not lumped up in a ball (look at the picture)


add the milk gradually stirring all the time

add the soup cube for a bit of an extra flavour

keep stirring often, until the mixture thickens. A word of caution here: you do not want your bechamel too thick as it will sit on your pasta in a separate layer and end up looking like a pudding.

Once you’re happy with the consistency (see the picture) add about ¼ of the cheese and stir to incorporate in the bechamel

now back to your pasta & meat sauce already sitting in the dishes:

sprinkle some cheese on the pasta

pour in ½ of the bechamel

at this point I like to pock it with a back of a fork in various places to make sure that the bechamel has gone through and will be present in every bite

add the remaining bechamel to smooth the surface

sprinkle the cheese on top

your pastichio is now ready for baking!!

IMG_2807

Since I almost always make two dishes at a time, at this point I let one of them cool nicely, cover it well, and put it in the freezer for future use.

Pre-heat the oven to 200 Centigrades, bake pastichio until bubbly and nicely coloured on top.

Enjoy!!